I know I just posted the coupon blog but I received my bradsdeals email and they had some awesome sales to for the holiday and I just had to share them!
2 piece chat set (patio furniture) $94 SHIPPED
Price drop from $169 to $84.99
+ coupon code BHAFFDIS drops to $63.74
+ 29.99 oversized shipping
I checked amazon and there are no reviews so I am not entirely sure of the quality of these items. You may want to do further research
Martha Stewart outdoor dinning set (7 pieces)
Home depot dropped the price from $549 to $399 plus free shipping!
Sunglass Hut %50 off on American Dream Sale
+ coupon code 2DAYSHIP gets you free second day shipping -they'll be here by the weekend
Check out Bradsdeals.com for more awesome savings!

Monday, June 27, 2011
Shopping list
Well I feel like I am selling you all a bit short again this couponing post. There TONS of deals to be had but I am still pretty stocked up here and we are headed out of town for a week of "vacay" (awesome!) this week so my time is limited. However, I did pull some of those unmissable deals this week!
Oh and please note: All the grocery store coupons are only good thru Tuesday.
One last thing, I have an abundance of bar soap and we are body wash people but I found a solution. So watch for my upcoming DIY post on how to make your bar soap in into liquid soap!
CVS
Schick Hydro 3 or Hydro 5 Razor or Cartridges (psa $8.99) B1G1 Free
- 2x $4/1 Schick Hydro Razor Coupon (6/12 SS) OR
- $2/1 Schick Hydro Refill Coupon (6/12 SS)
=.50 each
Pantene Shampoo, Conditioner, or Styler $3.49, Buy 2 and Earn $2 in ECBs (Limit 5)
- $1/2 Pantene Product Coupon (6/26 SS) OR
- $3/2 Pantene Product Coupon (6/19 SS) = 99¢ – $1.99 ea.
Palmolive dish liquid 10 oz $0.88
Final cost $0.88! - I saw a couple places that there was a coupon in this Sunday's paper?
Spend $15 on Participating Dove, Degree, Lever or Caress = $5 Ecb (limit 1)
Deal Scenario:
Buy 3 Dove Men+Care deodorants $3 each (through 6/30)
Buy 2 Dove Men+Care body wash $3 each (through 6/30)
Subtotal = $15
Use 3 $2/1 Dove Men+Care deodorant coupons found in the 6/26 RP
Plus, use the Buy 1 get 1 Free Dove Men+Care body wash coupon found in the 6/26 RP
Pay $6
Get back $5 Ecb
Final cost $0.20 per item!
Walgreens
Reach Dental Care $2.99, Earn $2 in Register Rewards (Limit 1)
- $2/1 Reach Toothbrush Double Pack Coupon (5/8 SS) OR
- $1/1 Reach Toothbrush Coupon (ALL YOU July ’11) OR -if you like couponing, this magazine is worth it!
- $1/1 Reach by Design Toothbrush Coupon (4/17 SS) OR
- $1/1 Select Listerine or Reach Products Coupon (4/17 SS)
= Free + $1.01 Profit
Twizzlers $1.50, Buy 2 and Earn $1 in Register Rewards (Limit 1)
- (2) 75¢/1 Twizzlers Product Coupon (6/26 SS)
= 25¢ ea.
Buy 2 Sally Hansen Nail Polishes on clearance for $0.50 each
Use the new $1/1 Sally Hansen Nail Color available on Coupons.com
Final cost – 2 FREE nail polishes!
* Note clearance does vary from store to store.
Shredded Wheat Original 9.25 oz box $1
Use the $1/1 regional coupon found in the 6/26 RP
Final cost FREE!
Buy 3 Participating Dove or Degree Products 3/$18 = $6 RR
Buy 3 Dove Men+Care Extra Fresh Body and Face Bar 6 Pack $6 each
(These should be included in RR deal as it states in the ad the 6-pack bar soaps are included)
Total = $18
Use 3 smokin’ hot $4/1 coupons found in the 6/26 RP
Pay $6
Get back a $6 RR
Final cost three 6-packs for FREE!
Kroger - there is a good deal on SILK this week at Kroger if you drink it
Driscoll’s Raspberries $1
- 50¢/1 Driscoll’s Berries Printable Coupon
= Free
- $1/1 Sure Deodorant Coupon (5/15 SS)
= Free
Johnsonville Smoked Sausage or Bratwurst – $2.99
-Use $1/1 Johnsonville coupon (SS 6/19)
Final Price = $1.99
Glade Candles or Febreeze Air Effects – $1.99 (Limit 3)
-Use $1/1 Febreeze coupon (PG 5/1) OR
-Use $1.50/2 Glade coupon (Sept All You)
Final Price = As low as $.99
- $5/1 Zyrtec Printable Coupon
= 27¢
Benadryl Anti-Itch Sticks $2.28
- $1/1 Benadryl Anti-itch Product Printable Coupon OR
- $2/1 Benadryl Topical Product Coupon (6/19 RP) OR
- $1/1 Benadryl Topical Product Coupon (5/15 RP)
= 28¢ – $1.28
Cheese Nips $1
- $1/2 Cheese Nips Coupon (6/19 SS)
= 50¢ ea.
Gillette Fusion ProGlide Razors (in travel size section) $4
Use the $4/1 coupon found in the 6/5 PG
Final cost FREE!
Shout Wipes (in Travel section) $0.75
Use the $1/1 coupon previously available
here
(no longer available)
Final cost Free + $0.25 money maker!
Pine-Sole Cleaner 28 oz. $1.97
Use the $1.00/1 coupon found here
Final cost $0.97!
Air Wick Freshmatic $4.97
Use the $4/1 coupon found in the 6/12 SS
Final cost $0.97!
Renuzit Adjustables $0.94
Use the $1/1 coupon I posted about here (no longer available ) or the Buy 2 Get 1 Free coupon found in the 6/12 RP
Final cost as low as Free!
Tic Tacs Big Packs 1oz $1.04
Use the $1/1 coupon found in the 6/12 RP (some regions received $0.75/1 coupons)
Final cost as low as $0.04 each!
Lala 8.1 oz Yogurt Smoothie drinks $0.93
Use the Buy 1 Get 1 Free coupon found in the 6/5 SS
Final cost $0.47 each!
Johnson’s Baby Lotion $1.97
Use the $1/1 coupon found here
Final cost $0.97!
Tylenol Precise $6.27 - Facebook followers, I recently mentioned that I love this product. I purchased it last time there was a $5 coupon and only bought one. This time I will be getting a few!
Use the $5/1 coupon found here
or use the $3/1 coupon found in the 6/12 RP or the $2/1 coupon found in the 5/8 SS
Final cost as low as $1.27!
Curad Band-Aids $0.96
Use the $0.50/1 coupon found in the 06/19 SS
Final cost $0.46!
Target
Pepperidge Farm Milano Melts Cookies 2/$4
Use the $1/1 coupon found in the 5/15 SS
Final cost $1!
Pepperidge Farm Crackers 6 oz 2/$4
Use the $1/1 coupon found in the 6/12 SS (Some regions received lower value coupons)
Final cost as low as $1 per box!
Heinz 16 oz Vinegar (White or Apple Cider) $1.12
Use the $1/2 coupon found in the 6/26 SS or here
Final cost $0.62 each!
Lipton Tea Bags 16 ct. Regular $1.09
Use the $1/2 Target store coupon found here
Plus, stack with the $1/2 coupon found in the 6/26 RP (Value may vary by region)
Final cost $0.09 each!
Neutrogena Sunblock Spray 5 oz $7
Use the $1/1 Target store coupon found here
Plus, use the $2/1 coupon found here
Final cost $4!
Benadryl Itch Relief Stick (0.47 oz.) $2.29
Use the $2/1 any Benadryl Topical Product coupon found in the 6/19 RP
Final cost only $0.29!
Hefty One Zip 12 to 40 ct $2.99
Use the $1/1 Target store coupon found here
Plus, use the $1/2 coupon found in the 4/10 RP
Final cost $1.99 each!
HEB
Benadryl Anti-Itch Sticks – $2.28
-Use $1/1 Benadryl Anti-itch printable coupon OR
-Use $2/1 Benadryl Topical coupon (RP 6/19)
Final Price = $.28
Danimals Crush Cups (4pk) – $1.96
-Use $1/1 Danimals Crush Cups coupon (in-store coupon)
Final Price = $.96
Pine-Sole Cleaner – $1.87 - We recently tried the Lavender when this deal came up last time, love it! A few people are having trouble with the coupon
-Use $1/1 Pine-Sol Cleaner printable coupon
Final Price = $.87
Vlasic Relish – $.98
-Use $1/1 Vlasic coupon (March All You) - Here's the magazine again!
Final Price = FREE
Zyrtec (5ct) – $5.27
-Use $5/1 Zyrtec printable coupon
Final Price = $.27
I wanted to mention one other thing. I cannot vouch for this product yet because I just signed up for it and the sample wont come in for a few days. Anyway this is high end beauty samples. I have heard they send full size samples. Its $10/mo but I have heard if you are into high end beauty products ( I am typically not because I don't like paying for them) this is an awesome thing. I figured I'd give it a whirl, if nothing else, I like getting packages in the mail once a month. birchbox.com --Check it out sign up now to get the July box!
Oh and please note: All the grocery store coupons are only good thru Tuesday.
One last thing, I have an abundance of bar soap and we are body wash people but I found a solution. So watch for my upcoming DIY post on how to make your bar soap in into liquid soap!
CVS
Schick Hydro 3 or Hydro 5 Razor or Cartridges (psa $8.99) B1G1 Free
- 2x $4/1 Schick Hydro Razor Coupon (6/12 SS) OR
- $2/1 Schick Hydro Refill Coupon (6/12 SS)
=.50 each
Pantene Shampoo, Conditioner, or Styler $3.49, Buy 2 and Earn $2 in ECBs (Limit 5)
- $1/2 Pantene Product Coupon (6/26 SS) OR
- $3/2 Pantene Product Coupon (6/19 SS) = 99¢ – $1.99 ea.
Palmolive dish liquid 10 oz $0.88
Final cost $0.88! - I saw a couple places that there was a coupon in this Sunday's paper?
Spend $15 on Participating Dove, Degree, Lever or Caress = $5 Ecb (limit 1)
Deal Scenario:
Buy 3 Dove Men+Care deodorants $3 each (through 6/30)
Buy 2 Dove Men+Care body wash $3 each (through 6/30)
Subtotal = $15
Use 3 $2/1 Dove Men+Care deodorant coupons found in the 6/26 RP
Plus, use the Buy 1 get 1 Free Dove Men+Care body wash coupon found in the 6/26 RP
Pay $6
Get back $5 Ecb
Final cost $0.20 per item!
Walgreens
Reach Dental Care $2.99, Earn $2 in Register Rewards (Limit 1)
- $2/1 Reach Toothbrush Double Pack Coupon (5/8 SS) OR
- $1/1 Reach Toothbrush Coupon (ALL YOU July ’11) OR -if you like couponing, this magazine is worth it!
- $1/1 Reach by Design Toothbrush Coupon (4/17 SS) OR
- $1/1 Select Listerine or Reach Products Coupon (4/17 SS)
= Free + $1.01 Profit
Twizzlers $1.50, Buy 2 and Earn $1 in Register Rewards (Limit 1)
- (2) 75¢/1 Twizzlers Product Coupon (6/26 SS)
= 25¢ ea.
Buy 2 Sally Hansen Nail Polishes on clearance for $0.50 each
Use the new $1/1 Sally Hansen Nail Color available on Coupons.com
Final cost – 2 FREE nail polishes!
* Note clearance does vary from store to store.
Shredded Wheat Original 9.25 oz box $1
Use the $1/1 regional coupon found in the 6/26 RP
Final cost FREE!
Buy 3 Participating Dove or Degree Products 3/$18 = $6 RR
Buy 3 Dove Men+Care Extra Fresh Body and Face Bar 6 Pack $6 each
(These should be included in RR deal as it states in the ad the 6-pack bar soaps are included)
Total = $18
Use 3 smokin’ hot $4/1 coupons found in the 6/26 RP
Pay $6
Get back a $6 RR
Final cost three 6-packs for FREE!
Kroger - there is a good deal on SILK this week at Kroger if you drink it
Driscoll’s Raspberries $1
- 50¢/1 Driscoll’s Berries Printable Coupon
= Free
Randalls
Sure Deodorant 99¢- $1/1 Sure Deodorant Coupon (5/15 SS)
= Free
Johnsonville Smoked Sausage or Bratwurst – $2.99
-Use $1/1 Johnsonville coupon (SS 6/19)
Final Price = $1.99
Glade Candles or Febreeze Air Effects – $1.99 (Limit 3)
-Use $1/1 Febreeze coupon (PG 5/1) OR
-Use $1.50/2 Glade coupon (Sept All You)
Final Price = As low as $.99
Walmart
Zyrtec, 5-Ct. $5.27- $5/1 Zyrtec Printable Coupon
= 27¢
Benadryl Anti-Itch Sticks $2.28
- $1/1 Benadryl Anti-itch Product Printable Coupon OR
- $2/1 Benadryl Topical Product Coupon (6/19 RP) OR
- $1/1 Benadryl Topical Product Coupon (5/15 RP)
= 28¢ – $1.28
Cheese Nips $1
- $1/2 Cheese Nips Coupon (6/19 SS)
= 50¢ ea.
Gillette Fusion ProGlide Razors (in travel size section) $4
Use the $4/1 coupon found in the 6/5 PG
Final cost FREE!
Shout Wipes (in Travel section) $0.75
Use the $1/1 coupon previously available
here
(no longer available)
Final cost Free + $0.25 money maker!
Pine-Sole Cleaner 28 oz. $1.97
Use the $1.00/1 coupon found here
Final cost $0.97!
Air Wick Freshmatic $4.97
Use the $4/1 coupon found in the 6/12 SS
Final cost $0.97!
Renuzit Adjustables $0.94
Use the $1/1 coupon I posted about here (no longer available
Final cost as low as Free!
Tic Tacs Big Packs 1oz $1.04
Use the $1/1 coupon found in the 6/12 RP (some regions received $0.75/1 coupons)
Final cost as low as $0.04 each!
Lala 8.1 oz Yogurt Smoothie drinks $0.93
Use the Buy 1 Get 1 Free coupon found in the 6/5 SS
Final cost $0.47 each!
Johnson’s Baby Lotion $1.97
Use the $1/1 coupon found here
Final cost $0.97!
Tylenol Precise $6.27 - Facebook followers, I recently mentioned that I love this product. I purchased it last time there was a $5 coupon and only bought one. This time I will be getting a few!
Use the $5/1 coupon found here
or use the $3/1 coupon found in the 6/12 RP or the $2/1 coupon found in the 5/8 SS
Final cost as low as $1.27!
Curad Band-Aids $0.96
Use the $0.50/1 coupon found in the 06/19 SS
Final cost $0.46!
Target
Pepperidge Farm Milano Melts Cookies 2/$4
Use the $1/1 coupon found in the 5/15 SS
Final cost $1!
Pepperidge Farm Crackers 6 oz 2/$4
Use the $1/1 coupon found in the 6/12 SS (Some regions received lower value coupons)
Final cost as low as $1 per box!
Heinz 16 oz Vinegar (White or Apple Cider) $1.12
Use the $1/2 coupon found in the 6/26 SS or here
Final cost $0.62 each!
Lipton Tea Bags 16 ct. Regular $1.09
Use the $1/2 Target store coupon found here
Plus, stack with the $1/2 coupon found in the 6/26 RP (Value may vary by region)
Final cost $0.09 each!
Neutrogena Sunblock Spray 5 oz $7
Use the $1/1 Target store coupon found here
Plus, use the $2/1 coupon found here
Final cost $4!
Benadryl Itch Relief Stick (0.47 oz.) $2.29
Use the $2/1 any Benadryl Topical Product coupon found in the 6/19 RP
Final cost only $0.29!
Hefty One Zip 12 to 40 ct $2.99
Use the $1/1 Target store coupon found here
Plus, use the $1/2 coupon found in the 4/10 RP
Final cost $1.99 each!
HEB
Benadryl Anti-Itch Sticks – $2.28
-Use $1/1 Benadryl Anti-itch printable coupon OR
-Use $2/1 Benadryl Topical coupon (RP 6/19)
Final Price = $.28
Danimals Crush Cups (4pk) – $1.96
-Use $1/1 Danimals Crush Cups coupon (in-store coupon)
Final Price = $.96
Pine-Sole Cleaner – $1.87 - We recently tried the Lavender when this deal came up last time, love it! A few people are having trouble with the coupon
-Use $1/1 Pine-Sol Cleaner printable coupon
Final Price = $.87
Vlasic Relish – $.98
-Use $1/1 Vlasic coupon (March All You) - Here's the magazine again!
Final Price = FREE
Zyrtec (5ct) – $5.27
-Use $5/1 Zyrtec printable coupon
Final Price = $.27
I wanted to mention one other thing. I cannot vouch for this product yet because I just signed up for it and the sample wont come in for a few days. Anyway this is high end beauty samples. I have heard they send full size samples. Its $10/mo but I have heard if you are into high end beauty products ( I am typically not because I don't like paying for them) this is an awesome thing. I figured I'd give it a whirl, if nothing else, I like getting packages in the mail once a month. birchbox.com --Check it out sign up now to get the July box!
Happy savvy shopping!
Sunday, June 26, 2011
DIY Welcome Mat ArtTutorial
First just let me say this fantastic idea was not my own. I picked it up off of Lowe's creative ideas section on their website, and creative it is. I just knew I had to give it a shot. The whole project cost me $27 and I now have art that took up the entire wall behind my couch (plus a nice new doormat) -not bad!

So you want to try it yourself?
First here's what you'll need, I didn't have to buy much because we had a lot of thing laying around the house I could use:
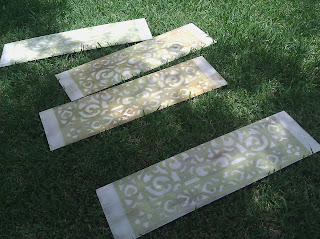
Boards or canvas the size of the mat (each pair is one mat)- When picking your boards pick ones that you can paint against the grain, I think they came out better, they are the two center ones in the above picture.
A background color - I used leftover paint we had here a green and a shade of white
1 paint brush
Spray paint - I used 1 can but it barely covered so I recommend 2, I chose off white
Sandpaper
Polyurethane - this is not mandatory but I used it and am very happy with the results
A door mat - I purchased mine from Lowes for about $19 but there are other places you can buy them. Amazon has several ranging upward from $10
You will also need to figure out how you are going to hang them. Depending on the material you use, you may have to buy hardware.
Start by cutting your boards the size of the mat. At this phase you can cut them in half again but, I chose to do that at the end. For mine, I added 6" to length of the mat, I wanted a 3" border at the top and bottom of the design. You do not have to do that, just go with what you think will work for your space. If you trace around the mat you will get nice straight lines for cutting.

After the boards were cut to size I painted them white. I wanted an older look so I just used a dry brush to paint leaving the wood peeking through in some areas.
I intend on repainting my living room an off white color some time in the near future so I decided to add green to contrast with the walls. I recently painted my kitchen green and the green is open to the living room, I am also making new couch pillows an drapes to tie the two rooms together. So I decided to use some leftover paint from the kitchen wall - that'll come on a different post!
Anyway, I used the same dry brush "technique" with the green, leaving some white and some wood showing through. I really wanted an aged, layered look.
Once everything is dry, here it only took about 3 min since it was so hot and the paint was such a thin coat, place the mat on the board. Your mat should line up on the two longer sides. If you decided to go with the border, measure 3" (or whatever distance you chose) from the top and then the bottom edge of the board in order to make sure everything is centered.
This part is why I decided to wait to make the last cuts. I thought it would be easier to make sure everything lined up. Some of the comments I read stated that people used a razor blade to make sure all the openings were evenly cut on the mat. I didn't do that because I wasn't looking for a perfect look, I don't think it made a difference anyway.

Now you're ready to bust our the spray paint!

Hang it Up!
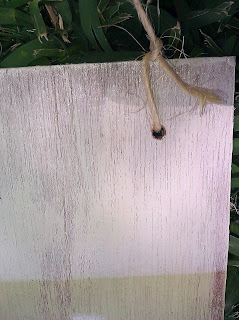
Once its dry you can hang them. I used twine to hang mine. The boards were too thin to put any screws or picture hanging hardware on the back without anything poking through the front. Here's how:
Drill a hole on each side to tie your twine. I put mine 1" down and 1" over.


So you want to try it yourself?
First here's what you'll need, I didn't have to buy much because we had a lot of thing laying around the house I could use:
Boards or canvas the size of the mat (each pair is one mat)- When picking your boards pick ones that you can paint against the grain, I think they came out better, they are the two center ones in the above picture.
A background color - I used leftover paint we had here a green and a shade of white
1 paint brush
Spray paint - I used 1 can but it barely covered so I recommend 2, I chose off white
Sandpaper
Polyurethane - this is not mandatory but I used it and am very happy with the results
A door mat - I purchased mine from Lowes for about $19 but there are other places you can buy them. Amazon has several ranging upward from $10
You will also need to figure out how you are going to hang them. Depending on the material you use, you may have to buy hardware.
Start by cutting your boards the size of the mat. At this phase you can cut them in half again but, I chose to do that at the end. For mine, I added 6" to length of the mat, I wanted a 3" border at the top and bottom of the design. You do not have to do that, just go with what you think will work for your space. If you trace around the mat you will get nice straight lines for cutting.

After the boards were cut to size I painted them white. I wanted an older look so I just used a dry brush to paint leaving the wood peeking through in some areas.
 |
| Excuse the bad lighting, it was hot and I was working under the trees. |
Anyway, I used the same dry brush "technique" with the green, leaving some white and some wood showing through. I really wanted an aged, layered look.
 |
| Its hard to see because of the tree above, but you get the idea. |
This part is why I decided to wait to make the last cuts. I thought it would be easier to make sure everything lined up. Some of the comments I read stated that people used a razor blade to make sure all the openings were evenly cut on the mat. I didn't do that because I wasn't looking for a perfect look, I don't think it made a difference anyway.

Now you're ready to bust our the spray paint!

If you are going for a look similar to the one I did. You don't need to be picky or worry with solid coverage. I spray painted some areas thicker than others. I just made sure everything had a coat of paint even if you could see some green or wood through. Do the same on both, or all 4 - if you've already cut the boards in half. I took the mat off pretty much immediately after I painted. I am not a very patient person and with 2 little ones, I don't have time to watch paint dry. Plus its so hot here it took the spray paint no time to dry. They did fine, just be careful not to smudge the paint as you lift the mat off. I did go back at this point and sand any areas I thought needed a little "extra wear" but there weren't many.
Once I was sure the paint was dry I turned the boards paint side down and measured the center to make my cuts. If you drag the saw across the painted side you may get black rub marks. Once the final cuts were made I sanded any of the rough edges and but a coat polyurethane over the boards. I mentioned earlier you can leave this step out. I decided to do it because the wood we used was leftover thin paneling type, from a previous project. The edge splinter pretty bad when you cut it and I figured the polyurethane would make for a smoother edge. I was pleasantly surprised because now when they are hanging on my wall the polyurethane really catches the light on the spray painted part and it looks neat.

Anyway set everything aside and let dry
Hang it Up!
Once its dry you can hang them. I used twine to hang mine. The boards were too thin to put any screws or picture hanging hardware on the back without anything poking through the front. Here's how:
Drill a hole on each side to tie your twine. I put mine 1" down and 1" over.

I measured 4 pieces of twine all the same length. I kind of just did a mock up to determine what I thought was a good length. Then I fed the twine through the back of the board and pulled through 3". Its important to measure how much you pull through so that when you hang them you can make all the nails level and your pieces will be level.

Once the twine was through I carefully tied a knot trying not to pull any more twine through the hole.

It was successful and they were easy to hang. We used tiny hooks that I spray painted then I was spraying the mat.

So here it is, and I am so happy with it. I can't wait to tackle those ugly walls, I am not a fan!


Let me know how what you think. If you try it, have fun with it and send pictures!
Tuesday, June 21, 2011
Shabby Chic toutorial
So after I posted my bed bench

I had a lot of people ask how I did the shabby chic "treatment." It was very much trial and error but I started with looking at a few inspiration photos.
I started by sanding everything. Since I was painting and not re-staining my main goal was to just rough up the finish. Due to previous experience I knew that a little of a pinkish red color would show through the paint where I sanded it all the way to the wood.
I wanted this to happen but if you don't you should prime with a good primer first. I painted two coats of blue getting good coverage. If I were to do it again I think I would go with one coat and more of just getting it on with a dry brush. I may do a second if I thought it needed more coverage but I would still use a dry brush technique. The reason you pick a color first is for a more layered (been painted many times) look. You can totally just skip on to the white if you prefer or even choose different pale colors. The blue I used was pool party by Glidden and it was pretty bright but a free sample so I made it work.


I had a lot of people ask how I did the shabby chic "treatment." It was very much trial and error but I started with looking at a few inspiration photos.
 |
| The Shabby Addict blog |
 | |||||||||
| This more of the look I was trying to achieve her blog is fabulous. |
I started by sanding everything. Since I was painting and not re-staining my main goal was to just rough up the finish. Due to previous experience I knew that a little of a pinkish red color would show through the paint where I sanded it all the way to the wood.
 |
| You can see the faint reddish spots here, this is after two coats of paint. |

Once I let it dry I came back with a white color ($5 oops paint in a white shade from Lowes) and painted it with the dry brush all over. I tried to make sure cracks and crevices got pretty good coverage with white. Since Shabby Chic is like wear and tear, usually paint doesn't naturally chip out of those places.
It didn't take long at all to dry since it was so hot and the coat was so thin. I went back and hand sanded anything that stuck out. With a course paper first then smoothed over it with a fine paper. I was trying to keep in mind, where would this get beat up if I were moving it in a moving truck. I think if you want more wood showing, more like the top inspiration picture, you could probably use a fine paper and lightly sand it all over with a power sander.

Once everything had a worn look I just eyeballed it and sanded bigger spots. Dont be too scared because you can always come back with a dry brush and the white if you think you overdid it (but wait until the end before you make that call.) On this bench I wanted the "wear" to be where I thought it would actually get wear. So I rubbed the tops of the arms pretty good.
Lastly, I came back with a bucket of water and an old washcloth. Since I used water base paint I just got the washcloth wet and rubbed the spots. Its helped smooth everything out and give it a more natural look.
You should probably seal it if you are putting it outside and I suggest a polyurethane but haven't found anything that doesn't yellow the paint, so just keep that in mind. Also if you find something to use as a true clear sealer, let me know. Keep in mind if the furniture is going to get lots of use you should probably use oil base paint to prevent scratching (although it may just blend.) The longer its dried the more the paint will harden and stick better.
Good luck, share your shabby chic project links in the comments. We'd love to see them!

A Bed to Bench DIY
We finally finished the 3rd bed to bench project. This is a pretty good couples project. Its fun to do and fairly easy. Plus I just like the teamwork with my husband on something apart from the kids. I know some of you have been awaiting its debut so without further ado here it is...

polyurethane or sealer of some sort -you won't need this if you plan to keep your bench indoors
tape measure
chalk line
To pick your bed :
You want a solid wood double bed. You could use a queen but it would be quite large plus theoretically if you use a double you can use a cheap crib mattress as the bench cushion. I look for beds at garage sales and typically don't have to pay more then $30 for them. They do not need to be in excellent shape because you are going to sand and paint it, but look for pretty details (scalloped edges, pretty cut outs...)
Lastly, you have to have a bit of a vision. You will be cutting the footboard in half to make the arms of the bench. Make sure you will be able to make a clean cut.
The picture below is an example of the second bed we did. I didnt pay close enough attention to the shape. Since headboard was curved so much for the sleigh shape we couldn't do it quite the same, it was still pretty but harder to work out.


Picking out the Plywood:
I say a whole sheet because you will need to get the measurements as you build so there is no way of knowing what size. If you already have plywood lying around you it will probably be around a 3'x4' piece so if you have something close to that then you may want to wait and see if you can use it.
You can buy a slightly cheaper grade of plywood if you plan on using a cushion because it will be covered. I Highly recommend you go that route, its hard to get everything to line up exact and the cushion covers any discrepancies. Make sure you buy a thick enough piece to be supportive and not flimsy.
Lets get started!
- I like to sand the whole bed before I start but you dont have to. If you want to prime it, now would be a good time to do that as well.
- Use the tape measure to measure the footboard from side to side to figure the center. Measure close to the top and mark the center then again close to the bottom and mark the center. Use your chalk line to make a straight line between your two marks. (From here on out you will measure the top and bottom and mark each measurement, then use the chalk line and I am not going to go into description on how to do it each time. In addition, MEASURE TWICE, CUT ONCE!)
- Set the footboard up on your saw horses ( or lowes buckets ) and make your cut with your circular saw
- I usually do a mock up at this point and lean the headboard upright against something. You will the cut edges of the footboard against the headboard. Before you drill use your level to get it as level as possible.
 - Now measure, cut and, install the plywood "seat." I recommend screwing the plywood to the support slats as well. I hope your bench is pretty sturdy by now? It should also look something like this, without being painted.
- Sand down and rough edges from cuts and drilling. Then use your filler to fill all the screw holes and blemishes. I use the caulk along the seams where the arms connect to the head board and the plywood connects to the side rail. It just makes for a much more finished look in the end. Try to get it as smooth as you can while its still wet. Once dry sand over the filled areas to make it smooth. You may need to caulk one more time to get it all flush. Wipe the whole bench clean
-It its totally dry and clean, you are ready to paint. (the shabby chic painting process will be my next post, For now, I painted blue or the under color you want first, you only need one coat of the first color for the shabby chic process.)
- Once it totally dries use the polyurethane (on white it will yellow slightly.)


As for the cushions, if you aren't into DIY sewing, here's a cheat- you should be able to use a crib mattress on the bottom and pick a crib sheet in whichever color you want. Then the back cushions I sewed covers for Euro pillows from Target (just $9.99) but, you could get sham that you like and just spray scotch guard over it all.
Good Luck!


And here is my attempt at at a DIY tutorial.
What you will need: (some of the things I have on hand but I will try to make a list as if you have none.)
1 wooden full size bed (more details to follow)circular saw
drill
level
saw horses or other method for lifting the wood off the ground while cutting (we use 2 Lowes buckets)
2 sizes of screws, I am not sure the measurements we use something like 11/2 inch and 21/2 inch
1 sheet of plywood (more details to follow)
wood filler - I use paintable caulk
paint and supplies- check the "oops" paint at hardware stores, you can often find great colors for just $5polyurethane or sealer of some sort -you won't need this if you plan to keep your bench indoors
tape measure
chalk line
To pick your bed :
You want a solid wood double bed. You could use a queen but it would be quite large plus theoretically if you use a double you can use a cheap crib mattress as the bench cushion. I look for beds at garage sales and typically don't have to pay more then $30 for them. They do not need to be in excellent shape because you are going to sand and paint it, but look for pretty details (scalloped edges, pretty cut outs...)
Lastly, you have to have a bit of a vision. You will be cutting the footboard in half to make the arms of the bench. Make sure you will be able to make a clean cut.
The picture below is an example of the second bed we did. I didnt pay close enough attention to the shape. Since headboard was curved so much for the sleigh shape we couldn't do it quite the same, it was still pretty but harder to work out.


Picking out the Plywood:
I say a whole sheet because you will need to get the measurements as you build so there is no way of knowing what size. If you already have plywood lying around you it will probably be around a 3'x4' piece so if you have something close to that then you may want to wait and see if you can use it.
You can buy a slightly cheaper grade of plywood if you plan on using a cushion because it will be covered. I Highly recommend you go that route, its hard to get everything to line up exact and the cushion covers any discrepancies. Make sure you buy a thick enough piece to be supportive and not flimsy.
Lets get started!
 |
| Don't forget your before picture |
- Use the tape measure to measure the footboard from side to side to figure the center. Measure close to the top and mark the center then again close to the bottom and mark the center. Use your chalk line to make a straight line between your two marks. (From here on out you will measure the top and bottom and mark each measurement, then use the chalk line and I am not going to go into description on how to do it each time. In addition, MEASURE TWICE, CUT ONCE!)
- Set the footboard up on your saw horses ( or lowes buckets ) and make your cut with your circular saw
- I usually do a mock up at this point and lean the headboard upright against something. You will the cut edges of the footboard against the headboard. Before you drill use your level to get it as level as possible.
 |
| Excuse the mess, we take everything out of the garage when we do these projects |
-From behind the headboard screw about 3 screws to secure the "arm." Use your longer screws and make sure to sink them just a bit so you can come back and cover them later. Make sure they are lined up and you may want to pre-drill the holes to prevent splitting the wood. Repeat for other arm
- At this point the bed should be pretty stable. Measure the distance between the two points you attache the arms to the headboard. Use the same measurement at the front of the arms and see how it looks. If it works you are going to use the measurement and cut one of the side rails that length. I like to measure using the hooks for support on one side (making only 1 cut) but you can also just make 2 cuts and screw both sides in. Install the side rail with the edge that the slats (if you were using it as a bed) would rest on closest to the top. You will screw from the outer side going into the side rail board.
-You should now have the frame standing. Use the other side board slats (if your bed came with them) two cut 2 or 3 support beams. You will install them front to back. I like to try to line it up where the top edge of the plywood will be installed close to flush with the top edge on the front side rail, but I've found you kind of have to work it case by case. - Sand down and rough edges from cuts and drilling. Then use your filler to fill all the screw holes and blemishes. I use the caulk along the seams where the arms connect to the head board and the plywood connects to the side rail. It just makes for a much more finished look in the end. Try to get it as smooth as you can while its still wet. Once dry sand over the filled areas to make it smooth. You may need to caulk one more time to get it all flush. Wipe the whole bench clean
-It its totally dry and clean, you are ready to paint. (the shabby chic painting process will be my next post, For now, I painted blue or the under color you want first, you only need one coat of the first color for the shabby chic process.)
- Once it totally dries use the polyurethane (on white it will yellow slightly.)

This should be somewhere close to what you are looking at. All there is left to do is add your cushions and voila!

As for the cushions, if you aren't into DIY sewing, here's a cheat- you should be able to use a crib mattress on the bottom and pick a crib sheet in whichever color you want. Then the back cushions I sewed covers for Euro pillows from Target (just $9.99) but, you could get sham that you like and just spray scotch guard over it all.
Good Luck!
Thursday, June 16, 2011
Hey A students...
I just came across this list from couponing 101. I don't have school age children yet but I think its fabulous these places will reward students for doing well. So here you go, treat your A students!
These offers may vary by location, so be sure to call the business first to check if they are participating.
Baskin-Robbins — Free scoop of ice cream for good grades on your report card.
Blockbuster — Free movie rental for A’s or B’s on your report card if you bring it in within 30 days of issuance. Kid’s grades K – 12 are eligible and multiple students from each family are eligible.
Cheryl & Co — Free cookie for every A on your report card!
Chick-fil-A – Free 8 pack of nuggets for your all A’s and B’s report card.
Chuck E. Cheese – Have your child bring in their most recent report card and they will receive Free tokens for good grades, up to 15 tokens maximum per child. (Food purchase required.)
Family Video – Free movie rental for each A on your report card. Students K – College are eligible.
Krispy Kreme – Receive a free donut for each A on your report card (up to 6 A’s).
Limited Too – Report cards may be taken in to any Limited Too retail store within 30 days of issuance and receive $5 off their purchase that day.
Noah’s Bagels – Kids in grades 1 – 8 will receive a free bagel for each A on their report card.
McDonald’s – Free Happy Meal if you have a straight “A” report card.
Peter Piper Pizza – Free 7 inch, 1 topping pizza with good grades on report card.
Pizza Hut – Free Personal Pan Pizza and a small soft drink or carton of milk with 3 A’s on your report card. Dine in only.
Sbarro Pizza – Student with A’s and B’s on his or her report card gets a free slice of cheese or peperoni pizza and a small soda plus one for the accompanying adult.
Topps – Free gift when you bring in your report card.
Homeschoolers can bring in report cards too, and here are some free printables HERE that you can try.
Sunday, June 12, 2011
Im back with a nick name, patio furniture, dad's day ideas, and more...
Well my neighbor and I were talking about coupons and home decorating on a budget and she started calling me the Savvy Saver...my TLC extreme couponer name? Haha, I always laugh when they say their couponing nickname and state thats what everybody calls them. I just have to make fun for min. Really? Thats what everybody just started calling you? I don't know, its just funny to me, I just don't imagine people actually using those nicknames,
Ok anyway, on to this weeks deals. I am only using my shopping list this week. To be honest, I'm trying to keep this short and sweet cause I have a pretty busy day planned.
Here is a list of possible dad's day gifts:
TODAY, SUNDAY ONLY Coleman 48 Quart Cooler for $17.99 at Sears.com Again, you can do local in-store pickup for free; otherwise shipping adds $8.20. HERE
REI Micro Duffle bag for $9.93 from $14.50, add it to your cart and the price drops to $7.93 HERE
Check out this sweet deal on a 3 piece bistro set @ Walmart for only $48. Use site to store shipping and pick it up locally, then you can avoid the $14 shipping charge. HERE
Now, onward with the usual! Again, there are a lot more deals this week, but here is my list.
RR= Register Rewards (Walgreens)
ECB = Extra Care Bucks (CVS)
SPC= Sunday paper coupon, this is followed with the date it ran, if known
The deals in Red are ones that you have to print a coupon
AC= Ad coupon (found in paper or at the front of the store. the last couple times I have been, I had to ask for a copy of the ad)
Walgreens
Blistex RPM or Men Lip Care 0.15 oz $2 = $2 RR - no coupons required!
Final Cost = FREE!
2nd transaction
Playtex Sippy Cups (Cars, Winnie the Pooh + more found near pharmacy) on sale for $3.99
Use the $2/2 Walgreens coupon found in the Infant Care Coupon Booklet
Plus, use two $2 off ANY one Playtex Infant Product coupon (To access this coupon, go here and sign up with PlaytexBaby.com. In about 12-24 hours, you’ll receive this coupon via email)
Final cost only $0.99 per sippy cup!
Lysol toilet bowl cleaner 16 oz Buy 1 at $2.99 get 1 Free with AC
Use the $1/2 coupon found in the SPC 6/12 or found here
Final cost $0.99 each!
CVS
Second transaction
Orbit Gum (14ct) – $.99 (BOGO)
-Use $1/2 Orbit Gum coupon SPC 4/17
Final Price = 2 for FREE
Stride Shift or Spark Gum – $.99 (B2G1 for $.01)
-Use $1/3 Stride Gum coupon SPC 5/15
Final Price = $.99 for 3 ($.33 each)
Buy 2 Colgate Total Toothpaste Whitening toothpastes 4.2 oz $2.79 (online price)
Use 2 Coupons for $0.75/1 from SPC 6/5
Dove bar 3.3-3.5 oz Buy 1 get 2nd for $0.01
Use the $1/2 Dove coupon found in the SPC 5/1
Final cost Varies!
Use the $1/1 Irish Spring coupon found in the CVS Reinventing Beauty magazine(You will have to check the store for this magazine. Try the cosmetics counter)
Final cost Free!
Good Luck!!
Ok anyway, on to this weeks deals. I am only using my shopping list this week. To be honest, I'm trying to keep this short and sweet cause I have a pretty busy day planned.
Here is a list of possible dad's day gifts:
TODAY, SUNDAY ONLY Coleman 48 Quart Cooler for $17.99 at Sears.com Again, you can do local in-store pickup for free; otherwise shipping adds $8.20. HERE
REI Micro Duffle bag for $9.93 from $14.50, add it to your cart and the price drops to $7.93 HERE
Check out this sweet deal on a 3 piece bistro set @ Walmart for only $48. Use site to store shipping and pick it up locally, then you can avoid the $14 shipping charge. HERE
Now, onward with the usual! Again, there are a lot more deals this week, but here is my list.
RR= Register Rewards (Walgreens)
ECB = Extra Care Bucks (CVS)
SPC= Sunday paper coupon, this is followed with the date it ran, if known
The deals in Red are ones that you have to print a coupon
AC= Ad coupon (found in paper or at the front of the store. the last couple times I have been, I had to ask for a copy of the ad)
Walgreens
Blistex RPM or Men Lip Care 0.15 oz $2 = $2 RR - no coupons required!
Final Cost = FREE!
2nd transaction
Playtex Sippy Cups (Cars, Winnie the Pooh + more found near pharmacy) on sale for $3.99
Use the $2/2 Walgreens coupon found in the Infant Care Coupon Booklet
Plus, use two $2 off ANY one Playtex Infant Product coupon (To access this coupon, go here and sign up with PlaytexBaby.com. In about 12-24 hours, you’ll receive this coupon via email)
Final cost only $0.99 per sippy cup!
Lysol toilet bowl cleaner 16 oz Buy 1 at $2.99 get 1 Free with AC
Use the $1/2 coupon found in the SPC 6/12 or found here
Final cost $0.99 each!
CVS
Huggies Big Pack Diapers – $19.83 (Limit 1)
-Use $3/1 Huggies Diapers printable coupon HERE
-Use $2/1 Huggies Diapers coupon SPC 6/12
-Get $4 ECBs Final Price = around $12 or $13
-Use $3/1 Huggies Diapers printable coupon HERE
-Use $2/1 Huggies Diapers coupon SPC 6/12
-Get $4 ECBs Final Price = around $12 or $13
Spend $10 on any John Frieda = $3 Ecb (limit 1)
Buy 2 John Frieda Full Repair shampoo, conditioner, or stylers $5 each (some are $8)= $10
Use 2 Coupons for $5/1 from SPC 6/5
Pay $6 - $0 + $3 Ecb
Final Cost = $3- (FREE + $3 money maker!)
Buy 2 John Frieda Full Repair shampoo, conditioner, or stylers $5 each (some are $8)= $10
Use 2 Coupons for $5/1 from SPC 6/5
Pay $6 - $0 + $3 Ecb
Final Cost = $3- (FREE + $3 money maker!)
Schick Hydro 3 or Hydro 5 razor 1 ct $8 = $4 Ecb (limit 1)
Use Coupon for $4/1 from SPC 6/12 or $3/1 HERE
Get back $4 Ecb
Final Cost = FREE!
Use Coupon for $4/1 from SPC 6/12 or $3/1 HERE
Get back $4 Ecb
Final Cost = FREE!
Irish Spring bar soap 2 pk or Softsoap liquid hand soap 7.5 oz 5/$5
Use Coupon for $1/1 Irish Spring from the HERE
Final Cost = FREE!
Use Coupon for $1/1 Irish Spring from the HERE
Final Cost = FREE!
Orbit Gum (14ct) – $.99 (BOGO)
-Use $1/2 Orbit Gum coupon SPC 4/17
Final Price = 2 for FREE
Stride Shift or Spark Gum – $.99 (B2G1 for $.01)
-Use $1/3 Stride Gum coupon SPC 5/15
Final Price = $.99 for 3 ($.33 each)
Buy 2 Colgate Total Toothpaste Whitening toothpastes 4.2 oz $2.79 (online price)
Use 2 Coupons for $0.75/1 from SPC 6/5
PLUS
Use CVS Coupon for $1/1 from the CVS Reinventing Beauty Magazine
Final Cost = $0.15 each!
Use CVS Coupon for $1/1 from the CVS Reinventing Beauty Magazine
Final Cost = $0.15 each!
Use the $1/2 Dove coupon found in the SPC 5/1
Final cost Varies!
Use the $1/1 Irish Spring coupon found in the CVS Reinventing Beauty magazine(You will have to check the store for this magazine. Try the cosmetics counter)
Final cost Free!
Good Luck!!
Thursday, June 9, 2011
Summer kid friendly craft - #1
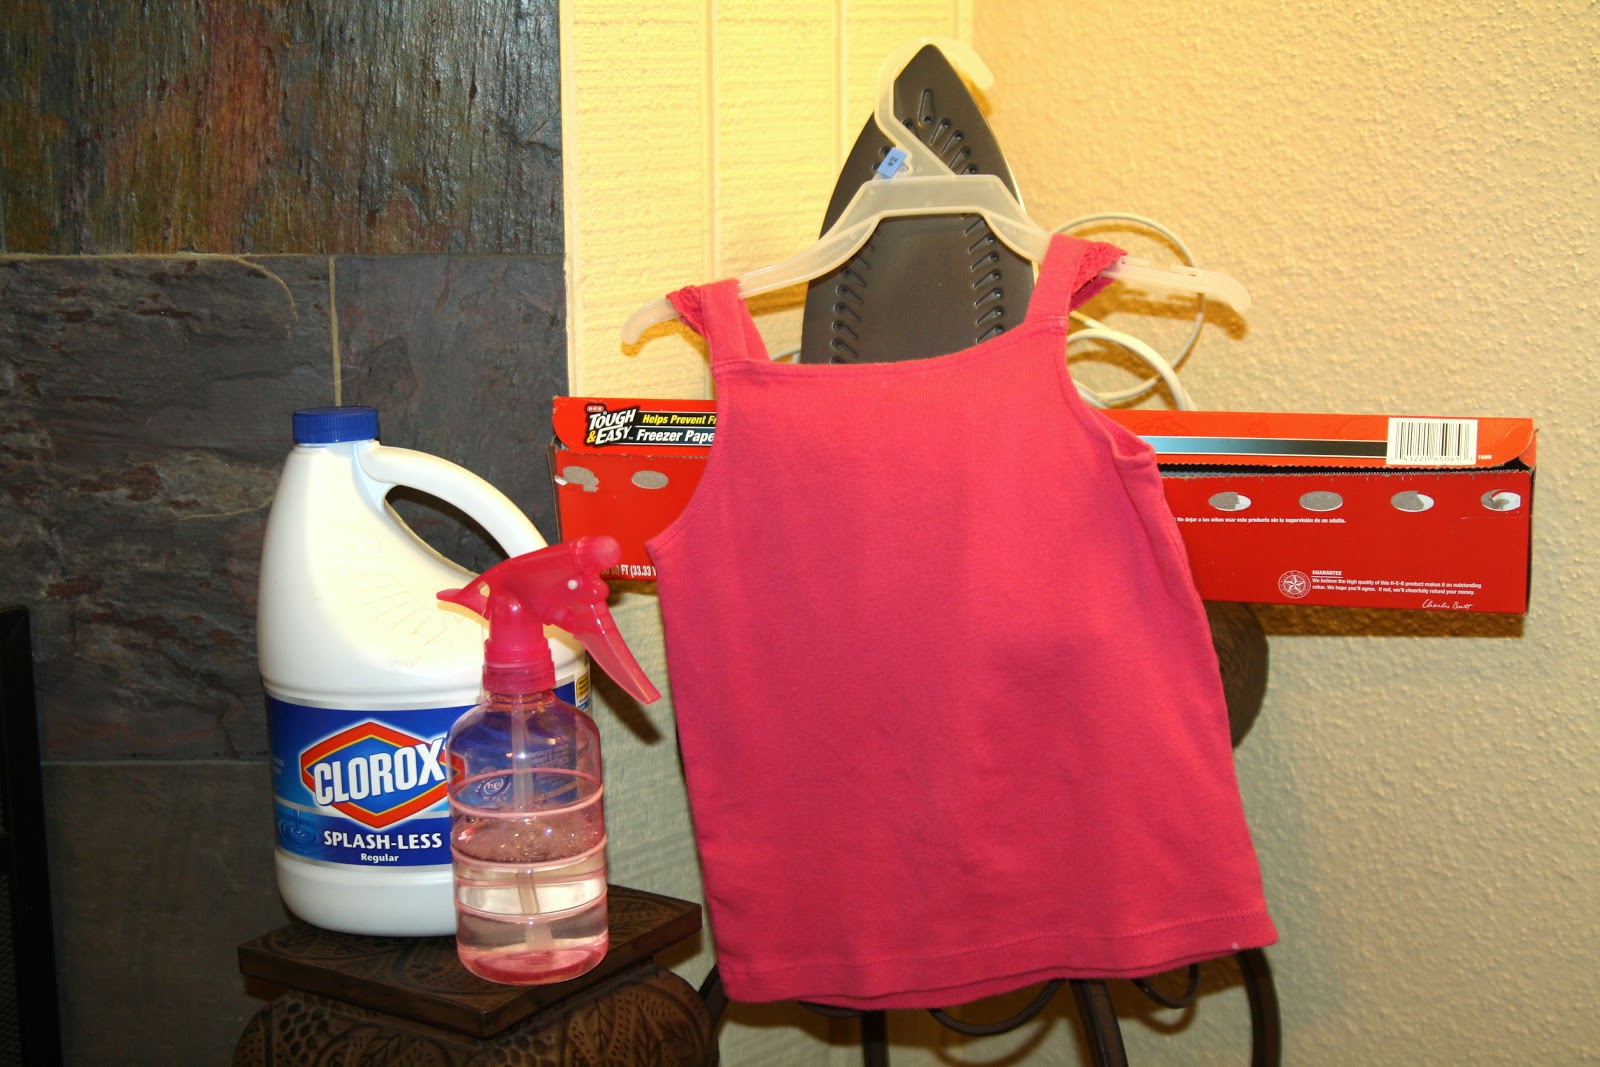
Custom T-shirt - ages 3 and up (maybe 2ish with spray help)
What you need:
Solid color T-shirt to fit your child (I just used one Emma had in the closet already)
Spray bottle with bleach/water combo (I used half and half, you can also use a squirt gun but I didnt have one handy)
Freezer paper
Cardboard or newspaper to keep the bleach from bleeding through

Ok first create a stencil design for the shirt. Draw the design onto the freezer paper and cut it out. I picked a heart because it was easiest on Emmas tiny Tee. The blog I got this idea from did the child's initial...

Iron the freezer paper stencil onto the shirt (shiny side down.)

Now you are ready to take it outside and spray it. Use the card board or newspaper inside the shirt (I skipped that phase and it was fine) and hang it up at the child's level. You can string a line, I just used the fence, but its short enough for Emma to still reach.

Let the kids have at it with the spray bottle or squirt gun then hang in the sun to dry (today it took like 10min tops and it was done)
Peel the stencil off...voila!

**disclaimer - Emma was anxious once I told her we were doing a craft so I didn't take the time to get out my camera and just used my phone. Looking at the pictures now, I may should have reconsidered that decision but, you get the idea. **
What you need:
Solid color T-shirt to fit your child (I just used one Emma had in the closet already)
Spray bottle with bleach/water combo (I used half and half, you can also use a squirt gun but I didnt have one handy)
Freezer paper
Cardboard or newspaper to keep the bleach from bleeding through
Ok first create a stencil design for the shirt. Draw the design onto the freezer paper and cut it out. I picked a heart because it was easiest on Emmas tiny Tee. The blog I got this idea from did the child's initial...

 |
| http://ashleyannphotography.com/blog/2010/06/11/summer-fun-custom-bleached-shirt/ |
Iron the freezer paper stencil onto the shirt (shiny side down.)

Now you are ready to take it outside and spray it. Use the card board or newspaper inside the shirt (I skipped that phase and it was fine) and hang it up at the child's level. You can string a line, I just used the fence, but its short enough for Emma to still reach.

Let the kids have at it with the spray bottle or squirt gun then hang in the sun to dry (today it took like 10min tops and it was done)
Peel the stencil off...voila!

Subscribe to:
Comments (Atom)